OAuth2 Login
M9sweeper supports using OAuth2 to authenticate, and has been tested with Google and Microsoft Azure AD. To add one of these login methods, go to “Organization Settings” > “Sign on Methods” and select “Add External Auth Configuration.” Then select the OAUTH2 Auth Type. After, select your desired implementation from the Provider Type dropdown, with implementation details found below.
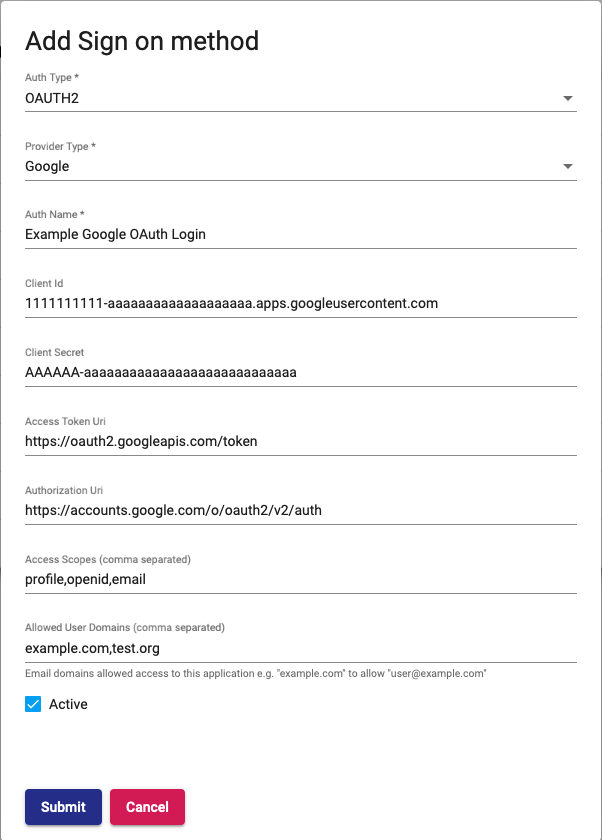
Make sure to give the sign-on method a unique name. Note that the Auth Name selected will be what users see when selecting a login method.
Google Oauth2
Using Google OAuth requires first setting up credentials through Google’s cloud platform console. Instructions on setting up necessary credentials can be found through Google’s official docs. When setting up credentials for M9sweeper, be sure to select the “Web Application” application type.
After creating your credentials, you will need to take the Client ID and Client Secret values generated by Google and add them to their respective fields in the configuration form.
Access Token Uri and Authorization Uri
These fields refer to the endpoints which the app will reach out to during the authorization process. They are automatically filled with the default values used by Google, and you should not need to modify them yourself.
Access Scopes
A comma separated list of the fields the app will request access to when querying data from a user. This is automatically filled with the information M9sweeper needs to access, and you should not need to modify it yourself.
Allowed User Domains
A comma separated list of what email domains are allowed access to your M9sweeper instance. This field requires the full domain name following the “@” symbol in your email addresses: for example, enter “example.com” to allow “any.user@example.com” to access your M9sweeper instance.
When a user first logs in using OAuth, if they are from an allowed domain they will be granted Read Only access, which you can freely change later on.
If someone attempts to log in using OAuth from a domain not in the allowed list, they will receive an “Access Denied” error.
Microsoft Azure OAuth2
Using Azure OAuth first requires setting up credentials through Microsoft’s Azure portal. Instructions on how to create these credentials can be found in Microsoft’s official docs.
After setting up credentials through Azure, you will need the Client ID for configuration in M9sweeper, added in the Client ID field of the configuration form.

Authorization Uri
The endpoint that M9sweeper will use to authenticate with Microsoft’s OAuth system. This field is automatically filled with the default endpoint, and you should not need to modify it yourself.
Access Scopes
A comma separated list of fields that M9sweeper’s OAuth will request access to. This field is automatically filled and should not need further modification.
Allowed User Domains
A comma separated list of what email domains are allowed access to your M9sweeper instance. This field requires the full domain name following the “@” symbol in your email addresses: for example, enter “example.com” to allow “any.user@example.com” to access your M9sweeper instance.
When a user first logs in using OAuth, if they are from an allowed domain they will be granted Read Only access, which you can freely change later on.
If someone attempts to log in using OAuth from a domain not in the allowed list, they will receive an “Access Denied” error.